It is Kalle month here in the Sew My Style Community! How are you coming along with yours? Whether you’re still looking for some direction or elbow deep in your project, you’ve got plenty of resources! If you missed it, I recently did a post with some fabric and styling inspiration here! Another great place to look for ideas is by using the hashtag #KalleShirtDress on Instagram. This is a VERY popular make amongst sewists, you could scroll for days gathering great ideas! Today, though – I’m here to show you all my finished Kalle!
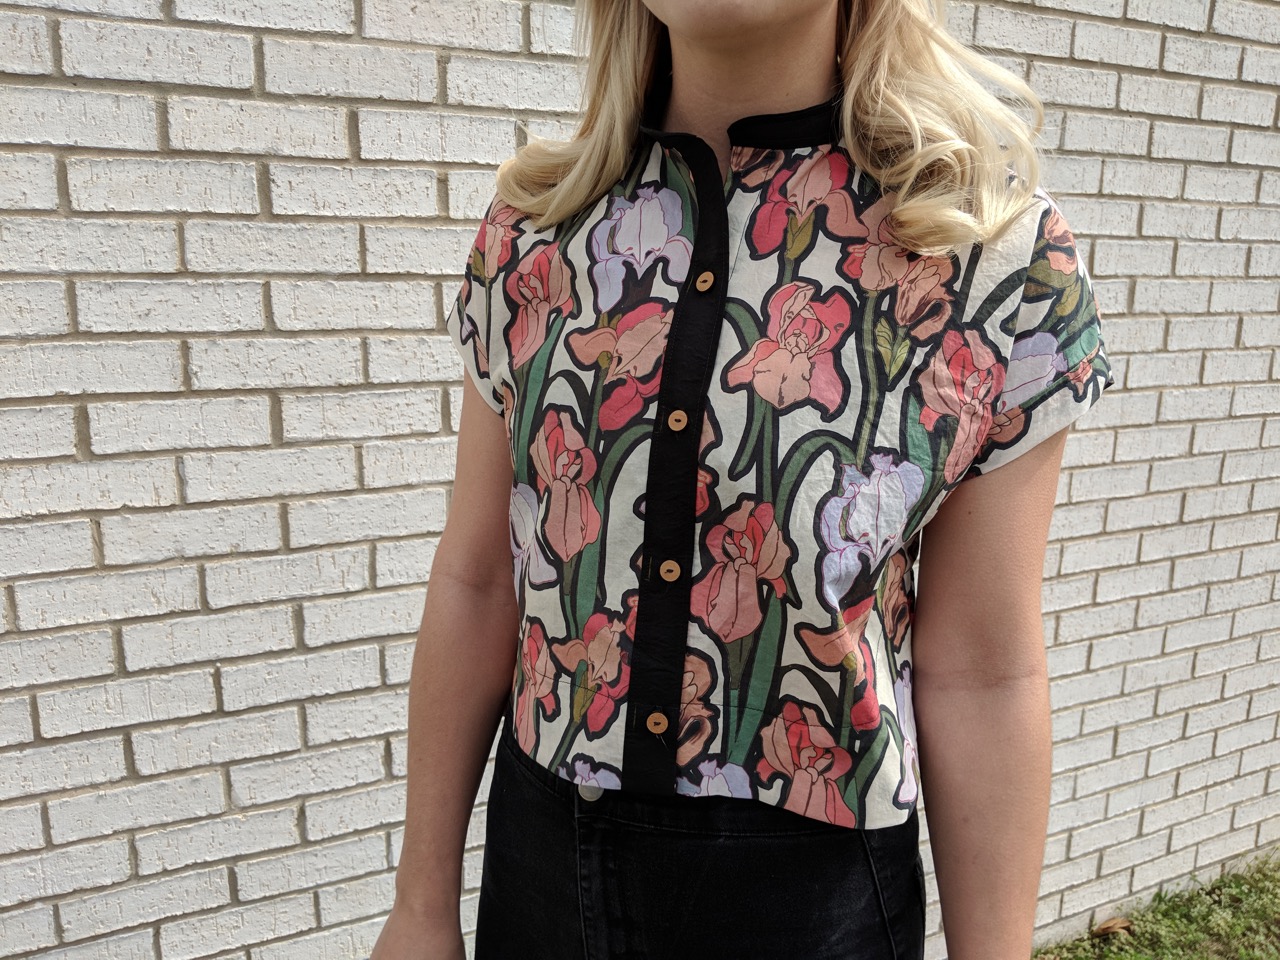
I’ve been making an effort this year to use the beautiful fabrics I’ve collected and left on my fabric shelves. I realized that I bought this great cotton lawn from Fabric Godmother last summer, and never quite put my finger on what I wanted to do with it. I love the bold floral print, but the dichotomy of the feminine, romantic floral colors, and bold black lines left me at a loss for the perfect pattern. This month’s project was exactly what (I didn’t know) I was looking for. Here’s how Kalle and I got along.

As you prepare to make your own version of this awesome pattern, you’ll have a few choices to make right off the bat. First off – length. The Kalle offers a cropped top with a high-low hem, accentuated by a thick, lovely facing, as well as tunic and dress length options finished with bias tape. All three options feature a really fantastic curved edge detail at the side seams. For my version, I decided that the crop would be the perfect, structured look to play up both the romantic, feminine feel of the print and those thick black accents.

Your next choice will be your button placket. For any length, you have the option of a full length, hidden placket, a shorter popover placket, or a standard, full length placket, I’ve been intimidated by shirts and shirt dresses for as long as I’ve been sewing, and have actively avoided them despite really loving the idea. One reason I was so excited to take the lead on this month’s pattern was there wouldn’t be any way to hide from the button-up anymore! I considered using the popover placket here, but I felt like that was my attempt to continue hiding from buttons and buttonholes, and decided I needed to commit to the full length placket.

Next up, collar options – standard shirt collar or band collar? Though the collar is also a key feature of the shirtdress that I wanted to tackle, I really felt like the band collar was necessary for the look I’d envisioned in my head. The thin but blunt band was a great way to bring a solid black accent into my design.

If you choose to utilize a pocket (or two!), don’t forget to consider placement! Whether you are a strict pattern matcher, or you’re featuring a stipe in an alternate direction on your pocket, these can really affect the final look of your garment! I opted out of the pockets for this version, because the print has enough going on as it is. However, a look I’ve really loved as I’ve looked at Kalle Inspiration is vertically striped fabric throughout the shirt dress, with pockets featuring the same stripe horizontally!

The last choice to be made is the inverted or box pleat along the center back of the shirt. Again, bold structure was the idea for me here, so box pleat won out. Heather’s sewalong mentions something along the lines of that the box pleat will make a more structured statement, while the inverted pleat will flow in a softer way.

Alright! Once you’ve made your decisions – on to the cutting table! Make sure you double-check which pieces you will need to match up with all the customized options you’ve chosen. If your make will be featuring the same fabric throughout, go to town with playing pattern-piece tetris and get your pieces cut out and ready to go. Although the contrasting solid black pieces were my plan from the start, they slipped my mind entirely as I cut my fabric and I ended up cutting everything from my printed cotton lawn! Luckily, I had plenty. In the end, I re-cut the placket and collar band pieces from the solid black fabric, and used the floral fabric for everything else.

For this top, I used only Heather Lou’s sewalong instructions! I have the actual pattern instructions saved in my Dropbox files, but I love the conversational style of sewalongs – and the step-by-step photos are SO helpful! I highly recommend using the sewalong as you work through your version. Because it is so thorough and detailed, I won’t be walking through any steps here, but I will highlight a couple of things I encountered!

One thing I could not seem to get right was attaching the placket to my shirt front! I cut the pattern piece and used my tailor’s chalk to note the buttonholes and other details, yet for some reason my brain could not figure out how to keep the top at the top and the buttonholes at the front while following the sewalong directions. After two failed attempts, I ended up cleaning the chalk off of my fabric, attaching the placket so that the top was at the top, and then re-tracing the button holes on to the front with the chalk. I’m pretty certain that this was due to my brain being a tired bowl of mush, though, and not an issue with the sewalong instructions. I also didn’t reference the actual pattern instructions when I got mixed up here, which may have helped, but my fix worked out just fine in the end!

My next area of difficulty was my hem facing. My best advice here is to pin, pin, pin (or wonderclip, wonderclip wonderclip!) and take your time. If you turn your facing in and you aren’t getting those perfect curves along the side seams, that is okay! Un-pick a little and try again. I did, and it was worth it to get that crisp, cool curve!

My gold star for the sewalong goes to the burrito yoke method. A lot of my hesitation to take on a shirt or shirt dress had to do with my idea that it was a very involved project. I was over the moon to find that all in all, this shirt was actually easy to construct! The yoke especially – for such a cool, attractive feature, it was surprisingly easy! I especially loved Heather Lou’s funny commentary that there is supposedly a more difficult way to construct a yoke, but why would anyone want that?!

Aside from my buttonhole / placket bit that I mentioned above, I followed the pattern and sewalong to a T. In the future, I may lengthen the front portion of the crop top simply because I have a long torso, but other than that, this thing came out perfectly on it’s own!

Top: handmade by me
Fabric: Coral Iris Cotton Lawn – Ivory from Fabric Godmother
Pattern: Closet Case Patterns – Kalle Shirt + Shirt Dress
Buttons: Plain Wood Round Buttons – Angela’s Line on Etsy

So there you have it, folks! My first button-up shirt, a glorious bold floral Kalle. This piece is a bit out of my normal style comfort zone, but I’m so fond of it already. It feels like it is a little bit cooler than I am! I have some beautiful linen fabric that I think will become a Kalle dress by the end of this month, so keep your eyes peeled for that come reveal day.
Until then, I hope you are all getting on well with your own Kalle projects! How have you customized yours? Where are you encountering hang-ups? Don’t forget that you can reach out to the awesome social media community we’ve got at our fingertips – the Sew My Style facebook group has been such a great place for makers to bounce their ideas off of each other! I can’t wait to see your Kalles popping up in the wild!

Though the Kalle Shirt + Shirtdress pattern was provided to me as part of the #SewMyStyle2018 leader team, all opinions expressed here are my own, as always!
- XX Elizabeth


Your Kalle is gorgeous! What a beautiful fabric for it too.
Thank you!!
I love your Kalle! It looks so good cropped! I have this on my sewing list too. Great job!
Thanks Vanessa! Let me know when yours is done – I’d love to see it!!
I really like the uniqueness of the fabric! I could see this kalle with a long dramatic black skirt as well!
Thank you! I hadn’t thought of that styling option, definitely going to have to try that!!! ?